Tuesday, December 14, 2010

Xpanomics

So I just wanted to make a short post about the economics of shooting various types of film with the Xpan. The film prices here were pulled from B&H on 12/14/2010, and the processing and scanning prices were pulled from North Coast Photographic Services (NCPS). It assumes about $0.50 of shipping for getting the film from B&H and then shipping it to NCPS, then shipping the processed film back. It also assumes you get 21 panoramic shots out of a roll of 36.

FilmRollShipProcScanTotalPer Pano (21)Per Std (36)
Fuji Provia 400X$9.89$0.50$8.25$5.49$24.13$1.15$0.67
Fuji Astia 100F$7.55$0.50$8.25$5.49$21.79$1.04$0.61
Fuji Velvia 50$6.95$0.50$8.25$5.49$21.19$1.01$0.59
Kodak E100VS$6.99$0.50$8.25$5.49$21.23$1.01$0.59
Fuji Pro 400H$6.89$0.50$5.50$5.49$18.38$0.88$0.51
Ilford XP2 Super 400$5.64$0.50$5.50$5.49$17.13$0.82$0.48
Kodak BW400CN$5.25$0.50$5.50$5.49$16.74$0.80$0.47
Ilford FP4 Plus 125$5.09$0.50$5.50$5.49$16.58$0.79$0.46
Kodak 400TX (Tri-X)$3.45$0.50$5.50$5.49$14.94$0.71$0.42


So we can clearly see that the venerable Tri-X is the most economical to shoot, but obviously it may not give the desired results or grain. I was a bit surprised to see that Provia came out to be most expensive. $10 per roll is way too much; not sure why it's that high.

Now the real trick is to not think about how much each shot is costing you, causing you to hesitate as The Moment passes. This is especially true of street shooting. I'm curious to hear what others do to mitigate the recurring costs of shooting film. Developing and scanning yourself seem like the obvious choices, but the time and tedium (not to mention chemicals) have their own costs associated with them.

I prefer to think of the cost in terms of something to pass the time. I could pay $20 and go to an amusement park, or eat at a semi-nice restaurant... or I could shoot a roll of Pro 400H for less. For me the reward is often being there, and the pictures come afterward.

If this post bored your completely, then check out how Steve Kamb is going to travel the world for $418.

Saturday, December 11, 2010

Seven Forty Seven

ORD to NRT

This is really more of a reminder to myself for future reference. When flying United to/from Narita (NRT), connect through Chicago (ORD), not LAX. Generally I'm not a fan of delay-prone ORD, but ORD to NRT gets you on a 747. LAX to NRT only gets you on a 777.

The route from LAX to NRT is entirely over water; it doesn't even come close to Alaska or Hawaii. The two engines on the 777 are impressive, but there are only two of them, and the Pacific Ocean is a monster body of water.

The route from ORD to NRT goes up over Alaska and northeast Russia. It's a barren world of ice, but it's something. Besides, you've got the 747's four engines to carry you over it all. This route also gives you some amazing views below if you get stuck in a window seat.

ORD to NRT

Bangkok

Chao Phraya Long Boat

I didn't have a lot of time in Bangkok this past week, but I did get to do a little exploring. My friends and I took the Skytrain from Siam down to Saphan Taksin on the Silom line. Our original plan was to take the express boat from there up the Chao Phraya River to Wat Po. Unfortunately, it appeared the regular boats had shut down early due to the holiday (the king's birthday). Luckily, help is never far in Bangkok, and it readily presented itself along with a price. The first guy wanted 600 Baht (about $20), which we all scoffed at. After a little wandering around, we talked to another guy who started off at 500 Baht. We asked for 400, and ended up meeting in middle at 450.

That kind of negotiation is pretty much standard on taxis, trinkets, and boats. It can be frustrating to approach every situation as a used-car-style negotiation, but there are a few things to keep in mind: 1) they really are trying to make ends meet, 2) they're expecting to be talked down, 3) there's another guy selling the exact same thing just a few steps away, and 4) the stakes are pretty low since you're usually talking just a few dollars difference.

In any case, the ride up the Chao Phraya river was so worth the 450 Baht. If you don't have much time in Bangkok, I recommend it as a way to get out of the bussel and see the city from a different perspective. Here are a few of my shots from the river and around the Grand Palace and Wat Po.

Chao Phraya Sunset

Wat Arun

Old City

Grand Palace

Saturday, October 23, 2010

Docking Bay

Docking Bay

This picture has nothing to do with anything. It's not even recent. I just felt like posting it along with a few interesting, unrelated links:

Probably the most beautiful bicycle I've ever seen (and a cool photo project) at #BikeNYC.

Slow motion video of the 5D shutter. Look at the way the mirror bounces at the end. It's no wonder mirror lock-up reduces vibration.

I'm looking forward to the Fuji X100. I hope it lives up to expectations.

This makes me want a Fuji GA645, though when I held a Fuji 6x9 at B&H a while back, it really did feel cheap. It's tough to argue with results though.

Valid code quality measurement, reposted from Chris Gooley a while back.

Flight Control is probably the best game I've ever played on the iPod. $1 addiction.

Saturday, October 16, 2010

Return to Delaware Water Gap

Last weekend was a great chance to capture some fall color. This season seems to be the most gradual transition to fall that I've seen in a while, so there may not be one big explosion of color this year. This is fine by me, as I never really look forward to the grays of winter.

This year we decided to head up to Delaware Water Gap National Recreation Area and stay in Matamoras, PA. This gave us great access to Pennsylvania, New York, and New Jersey, though we didn't actually make it into latter of the three. Also, hotel rooms are pretty cheap in this area, so don't do like I did last time and sleep in the car.

I also simplified my gear for this trip, only taking the 5D, 24-105/4 IS, 17-40/4, and 50/1.8 (why not). I also had a small tripod with me, but it stayed in the car the whole time. The 24-105's IS was good enough that I could get shots of the waterfalls at 1/4 sec. hand-held.

Bridal Veil Falls

We also lucked out with an amazing sunrise over Port Jervis on our first morning. We drove a few miles up both sides of the Delaware River. For future reference, you can skip driving up the Pennsylvania side of the river north of Matamoras; it's all private residences. The New York side was amazing along highway 97. There were some great overlooks and we caught some rising fog along the hilltops.

Port Javis Sunrise

Delaware River

A useful strategy we've developed is to get up early, explore, take a mid-day nap, then explore some more in the afternoon and evening. The light is better at the extremes anyway, plus the crowds are nonexistent early in the morning. After our nap, we hit up some more trails at Dingmans Falls and Raymondskill Falls. I felt like I captured Dingmans Falls reasonably well last time, so I tried to focus more on close-up details and other elements that usually get missed.

Walk in the Woods

Canopy

Shelter

This last picture was one I particularly wanted to get since these very same leaves saved me from a downpour last time I was on this trail a couple years ago. Thankfully we had great weather this time around.

Make sure to take advantage of the fall color this year. It seems like every fall is a little different. Some are better than others, and sometimes the weather is against you, but there are almost always opportunities to be had. Happy shooting!

Sunday, September 26, 2010

Cloudy Sunday Blah

CN Lake Ontario

And I mean that in a good way. We all need that solitary downtime. A good low-contrast day to let our minds explore and relax. Listen to some Chopin or Gershwin while you're at it. Make a photo book, perhaps. Here's a photo book I recently made from my Alaska trip last year:


As an update to those interested, here are a few photos from our summer trip to Rochester, Niagara Falls, and Toronto (plus the image up top):

Rochester

One War Memorial Square

Times Square Sunset

Mist

Niagara Falls Night

Vineyards

Robert Moses Dam

Spaceship City Hall

Sunday, July 4, 2010

Macro in Patapsco

Ok, back to actual photography. Today I took my 5D and 50/1.8 to Patapsco Valley State Park in Elkridge, Maryland. I was somewhat confined to a particular part of the park though, so I decided to take my extension tube (EF25II) and explore my little corner of the park in macro. As always, God is in the details, and if you're shooting macro, the world is suddenly a whole lot larger.

I was shooting everything handheld today, which is somewhat tricky for macro photography. A couple things that helped though:
  • Use AI Focus or Continuous focus mode. With such a shallow depth-of-field (millimeters), you and the subject will inevitably sway towards and away from each other. AI/Continuous focus can help compensate for the constantly changing distance between you and the subject.
  • Switch to manual focus when auto-focus fails you (it will at times), or as a starting point before you turn on auto-focus.
  • Shoot subjects that are in direct sunlight, with shade in the background. The sunlight/shade contrast will help your subject stand out from the background. The direct sunlight will also give you the high shutter speed you need to compensate for all the little movements that can occur in the macro world.
  • Don't be afraid to shoot without looking through the viewfinder. Good macro subjects are sometimes high, low, or in tight spaces. Aim the camera as best you can and give it your best shot. If your camera has a Live View feature, then definitely use it.

Here's my top five for the day. There's a little more detail in the flickr comments for each photo, so click on the image if you want to know more.

Narada

Array

Tanning Insect

Red Invaders

Crooked Little World

Happy shooting, one and all, large or small.

Thursday, July 1, 2010

Xpan repair story

Ok, so this travel blog is turning into more and more of an Xpan blog. But hey, why not run with it for now...

After my Shendandoah trip, I started to notice that the parallax focusing prism was just not right. I would focus on the same object from the same location with the camera in different orientations (i.e. horizontal vs. vertical) and get different distance readings on the top of the lens. Not really a problem when shooting landscapes at f/16, but nonetheless, just not right.

I briefly entertained the idea of trying to fix it myself, but after loosening a few screws to remove the top, I concluded that I was only going to do more harm than good. It was time to bite the bullet and ship it in to someone who knew what they were doing. But where to begin?

Hasselblad.com listed Greg Hollmann as the regional partner for Maryland, so I dropped him an e-mail at ghollmann@hasselbladusa.com:
The rangefinder focus on my Xpan does not seem to be completely accurate sometimes. I'd like to have it looked at, but I don't know where to take it or ship it. I'm currently residing in Baltimore.

He promptly replied:
Hi Bill,
We have a service center in NJ, they will be able to take care of you. Here is the contact info:

Hasselblad USA - Camera service center
333 New Road, Suite no. 5
Parsippany, NJ 07054
USA
Phone number +1-973-227-7320
Fax +1-973-227-1063

Great! I carefully wrapped and boxed up the Xpan with a formal letter enclosed (headers omitted here):
To whom it may concern,
The parallax focusing mechanism on the enclosed Xpan (serial no. xxSSyyyyy) appears to be loose. It seems to go completely out of alignment after I have the camera tilted to the right (i.e. right end of the camera pointed downward). By tilting the camera to the left, then shaking lightly, the focus mechanism seems to fall back into place. It's difficult to be certain that I'm getting proper focus again though. Please examine and repair if possible.

I shipped it off via USPS with delivery confirmation and $800 of insurance for $17.95. Not bad at all. Three days later I received an e-mail from Maryann Murphy at Hasselblad:
Mr. Allen
We have evaluated your camera and determined it needs to be cleaned and calibrated. It also needs the Prism to be tightened. The cost of the repair is $193.00 including shipping.

Please advise if you want to proceed. Your repair # is xxxxxx.

Generally when I think Hasselblad, I think big $$$, so it was a pleasant surprise to get a quote of $193. Of course I gave the go-ahead. The following Monday I received another e-mail from Maryann:
Hi Bill,
The repair has been completed to your xpan. It has been calibrated, cleaned and the prism tightened. I just need a credit card and it will be shipped.

Now I can be slightly paranoid when it comes to credit card numbers, so I decided to give her a call the next day instead of simply e-mailing her my credit card number. She was ready with my order when I called though, so the call was about as painless as possible.

The camera arrived a few days later via UPS (after a three rounds of delivery tag). I took it out of the box and was very pleased with what I saw. The viewfinder was pristine and the focusing mechanism was smooth, tight, and accurate. If it weren't for the wear on the finish, I'd have thought I was holding a new camera. The only down side of the whole thing was that the battery had run down during the journey, but that's no big deal. I keep spares in my Xpan Go Bag.

So if your Xpan (or any Hasselblad) is starting to show its age, I hope this article helps quell your fears a bit. Of course, this is the USA, so I have to list the following disclaimers:
  • Your mileage may vary greatly in terms of pricing and timing depending on what's wrong with your camera.
  • I have absolutely no relationship with Hasselblad; I did not get any freebies, discounts, or other compensation for writing this article.
  • Please confirm any contact info I have listed here, as it may have changed. Do not blindly ship your beloved camera to Parsippany, NJ.

And don't worry, I'll get back to posting pictures soon.

Sunday, June 20, 2010

Xpan in Port Covington

Here's one of the two shots I took with my Xpan last weekend while finishing up a roll at Port Covington. I'm really liking this Kodak E100VS. The colors you're seeing here are straight out of the camera. Awesome. This shot also makes me really want the 90mm lens. Maybe when I get the Xpan back from the shop... More on that later.

E100VS Sunrise

Saturday, June 19, 2010

Shenandoah Follow-up

This is just an Xpan photo follow-up to my trip report on Shenandoah National Park. Enjoy!

Imprint

Big Meadows Fog

Skyline Drive

Skyline Grass

Old Rag

Overhang

Saturday, June 12, 2010

Early Morning Do

Do get up about 45 minutes before sunrise.
Do go to a spot you've been meaning to explore for a while.
Do take your favorite camera(s).
Do shoot, shoot, shoot.
Do stop for a few minutes to breath in the air and take in the location.
Do shoot as you leave.
Do leave slowly.
Do return.

In my case, I'd been meaning to go to a spot behind the Sam's Club in Port Covington, just south of downtown Baltimore. After exploring it further on Google Earth, I realized it was actually an old, over grown dock with some great views of the harbor; stuff the tourists would never, ever take pictures of, even though they'd readily go into the Sam's Club. Heck, they might even buy a new camera at the Sam's and never notice that some cool pictures were right around back.

Anyway, my main mission was to finish off the final roll of film from Shenandoah. As you'd expect, that didn't take long. Of course I had to take a few pictures of the Xpan setup with my 5D. I took my film to the post office once they opened. Just $1.95 to mail two rolls from Maryland to California... not bad. Hopefully they will be back in the next week or so. In the meantime, enjoy these shots from my 5D with the 50/1.8.

Harbor Morning

Sunrise Shipping

Beautiful Morning

Harbor Foreground

Enjoy, and don't forget to do your do's!

Monday, June 7, 2010

At Last, Shenandoah

Who knows how many times I've flown over Shenandoah National Park. Dozens? Yet I'd never been there. I was always headed to "bigger and better" things out west (Yellowstone, Denali, Zion, etc.). That all changed last weekend.

With the Xpan stuffed in my backpack, we headed west. We shot around the DC beltway, out on I-66, then down US-29 to VA-211. As we reached Sperryville, our lunch options began to dwindle. Luckily, we found High on the Hog BBQ for some good local "grub". Topped off, we wound our way up 211 and headed further back in time.

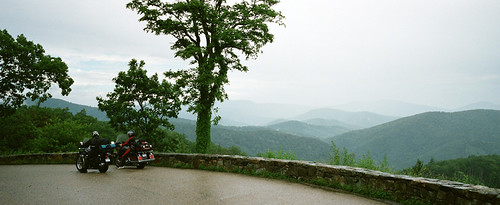
We entered the park at Thornton Gap. The friendly ranger gave us a map, told us it was a free weekend, and waived us on through. Excellent. With the Skyline Drive in our sights, we headed south.

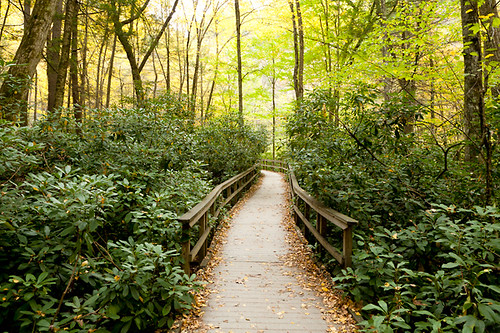
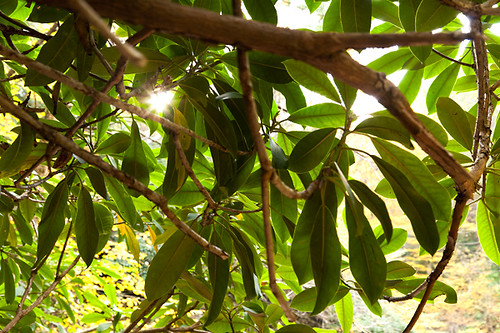
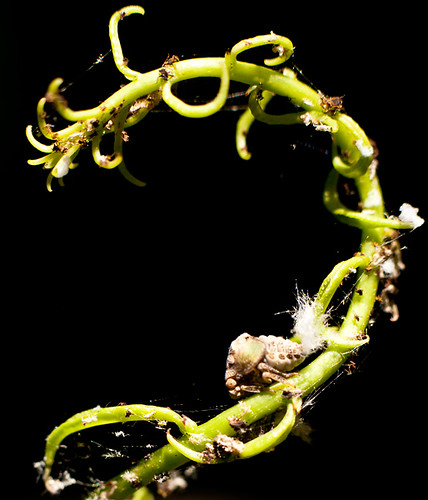
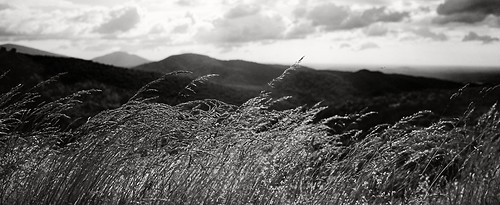
After some stops at various overlooks, our first main destination was Limberlost trail near mile marker 43. It's probably one of the easiest trails you'll find in the whole park. It's paved with gravel and rated as ADA accessible. This isn't some blah trail though. There's plenty to see and photograph if you pay attention to the details and patterns. Also, if you wear some boots and long pants you'll have a little more freedom to get off the trail to explore different angles.

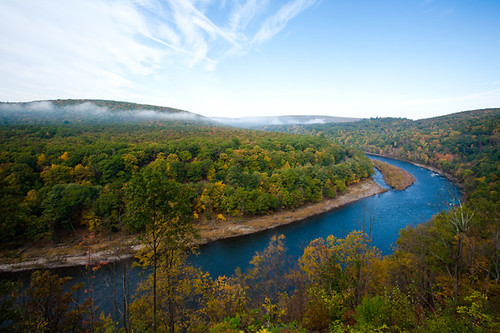
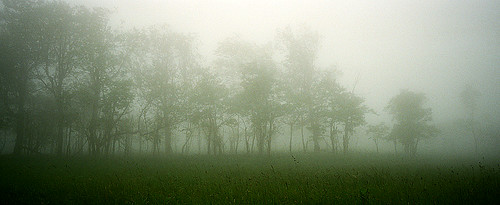
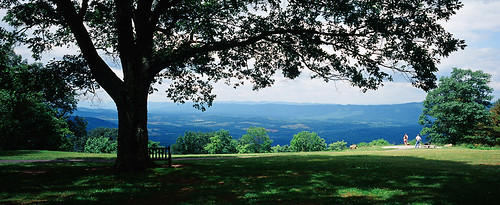
When we were done with our hike, we continued to head south to the Byrd Visitor Center at Big Meadows. The Meadow is indeed Big, especially by east coast standards. Unfortunately, heavy rain and fog rolled in just as we got out of our car. After sitting tight for a little while, we decided to start working our way north again, toward Luray.

We checked in at the Days Inn. The accommodations were completely adequate for our needs (bed, thermostat, shower,... ahem... free wifi). Also, if you find clashing decor entertaining, then this is definitely the place for you. After we got settled, we headed into town to find some food.

Artisans Grill was actually one of the surprise highlights of the trip. We settled on it after driving up and down Main St. a few times. The food and service were excellent, and the prices were reasonable. It will almost certainly be our go-to spot the next time we find ourselves in Luray.

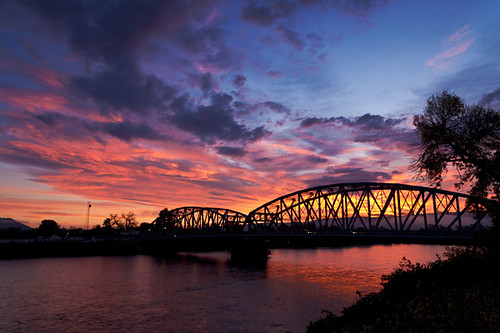
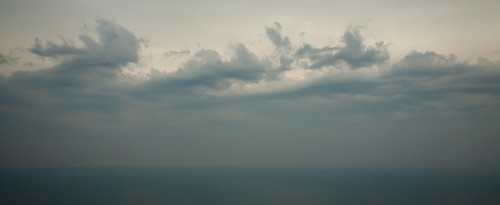
After dinner, we made a cold, windy, and brief attempt to watch the sunset from one of the overlooks. With the Sun setting so late in the evening though, we decided to call it a day and head back to the hotel.

The next morning, we reentered the park at Thornton Gap and headed north on the Skyline Drive. It was a Monday, so unfortunately the free weekend was over. I gladly paid the $15 though; it was certainly going to a good cause.

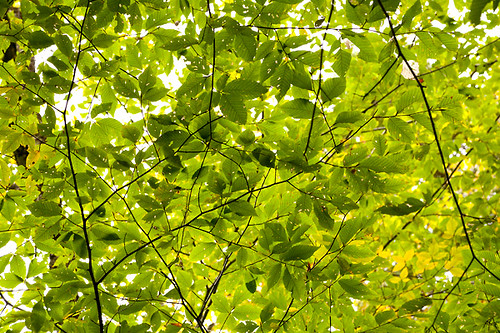
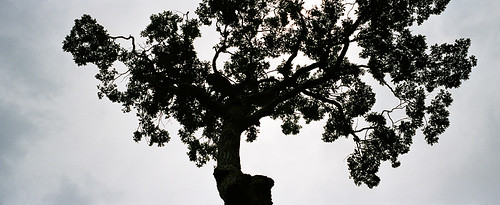
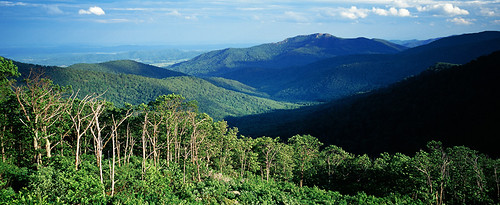
The Fox Hollow Trail was our next major destination. This was also a worthwhile hike. Though not as easy as Limberlost due to its inclines. It's still one of the easiest trails in the whole park though. We were amazed how different this trail was from Limberlost too. The huge poplar trees seemed to loom over the entire forest. Be sure to pick up a $1 guide book at the trail head. There's a lot of history along this trail, so you're going to want to follow along.

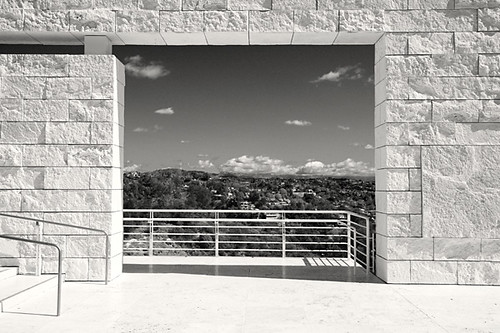
With another great hike behind us, we made a brief stop across the street at the Dickey Ridge Visitor Center. As we headed north out of the park and into Front Royal, we could satisfyingly say we'd been to Shenandoah National Park.

--

The main book we used on this trip was Best Easy Day Hikes, Shenandoah National Park. While not photographically oriented, this book does give some great tips on where to go. When you're reading it though, keep in mind that when they say "day hikes", they mean "day hikes." In other words, make sure to look at the distance, difficulty, time, and your supplies before picking a hike. On the plus side, many of the hikes are out-and-back, so you can turn around when you've had enough. Also, for the photographer, finding "easy" trails is important when schlepping camera gear. Pick and choose what you take.

Another useful book when visiting any national park is the National Audubon Society Guide to Photographing America's National Parks, which you may have seen me mention before.

Alas, there are no pictures to share from this trip yet. That is the price of stepping back in time and shooting film. More to come...

Sunday, May 23, 2010

Geometric Getty

Besides being an architectural masterpiece, The Getty Research Institute is the perfect place to practice your your geometric photography skills. What am I talking about? I'm talking about clean lines and simplicity that generally lead to better photos. In other words, think of your photos more in terms of graphic design, with a few clean shapes, solid colors or smooth gradients.

John Shaw goes on a bit about this near the end of his Landscape Photography book when talking about the Palouse region of Washington. The book may be out of print now, but its lessons on composition still apply. It also has one of the best explanations of exposure (i.e. what "stops" are) that I've ever read.

Anyway, back to the Getty. Absolutely go there, enjoy the architecture, and start thinking of your photos more in terms of clean, abstract graphic designs.

My shots here were mostly taken with the 5D and 50/1.8, but you really don't need anything more than a point-and-shoot to take advantage of the amazing architecture. I feel like these photos only scratch the surface of possibilities at The Getty.

Getty Frame

Getty

Getty Vines

Getty Wall

Getty

Happy shooting!

Sunday, April 11, 2010

The Joshua Tree

Joshua Tree

Before leaving for Los Angeles, I was trying to pre-visualize some of the shots I wanted out of the trip. Joshua Tree National Park was one of our planned destinations, so naturally U2's The Joshua Tree came to mind. The funny part is, I never actually looked at the album cover for inspiration. I just sort of assumed it looked something like the shot above. I came home, processed the image, and posted it on facebook and flickr. At some point it dawned on me that I still hadn't actually seen the album. Much to my surprise, it looked absolutely nothing like the shot above, nor did any of the other album art. Perhaps this is a technique I should try more often. Pick a song or album and shoot my vision of the cover, then compare the two afterward.

This next shot is one of my other favorites from the trip. I didn't quite pre-visualize this one as clearly as The Joshua Tree, but I did know that I wanted to try capturing the sheer open spaces and big sky out there. I had forgotten just how many planes fly over Joshua Tree though. Normally this would annoy me if I was trying to get a clean, natural landscape, but in this case, it worked out just right, adding an interesting contrast between the natural whispy clouds, and the distinct contrail lines. As usual, I had my ideal general purpose lens mounted, the 24-105/4 IS. Part of me wonders if 17mm would have been better, but shooting that wide may have made the distant landscape a little too, well, distant. Personally, this shot also reminds me of the classic game, Missile Command, after all the cities have been destroyed. I prefer not to think of Joshua Tree National Park as a post-apocalyptic wasteland though. It's quite the opposite, full of life and wonder.

Missile Command

Here's to another great trip!

Tuesday, March 30, 2010

Another wave of photos

I've been pretty bad about posting lately, so here comes another wave of photos, this time from the Aquarium of the Pacific in Long Beach, California. I walked in with nothing but the 5D and, more importantly, the 50/1.8. The thrifty fifty saved the day in those dark aquariums. The only problem is that it makes me want the 50/1.4 even more. Hmm. Anyway, enjoy!

Jelly

Fish

Lobster

Starfish on Glass

Yawn or Rawr