Saturday, December 22, 2012

Forwards and Backwards

Forwards: The trusty, old 4GB Core2 Quad I built in 2008 finally took a turn for the worse. The main 160GB IDE drive was giving all kinds of random read and write errors, and the heat sink simply wouldn't say on the processor. Obviously, both of these problems could be easily fixed piecemeal, but it was time for something new. Four gigabytes of RAM just isn't enough to run Chrome, Lightroom 4, Photoshop CS5, and iTunes. Thankfully a new Microcenter opened up nearby just a couple months ago. A couple days and a few hundred dollars later, I'd built a quiet Core i5 with 16GB of RAM and 120GB SSD. Amazing. I guess I can't really be that amazed with something like an iPhone 4 in my pocket. Now that's amazing.

Backwards: I've had the Leica M6 for just over a year now. It hasn't had a working battery for almost that entire time, which means I've been eyeballing the exposures for a year now. The pictures below were uploaded to flickr without any levels, brightness, or contrast adjustments in Photoshop or Lightroom. They're essentially straight out of the camera. It's a good feeling.

Perhaps the moral of the story is that you don't really need a faster computer any more than you need a "better" camera if you take your time and get it right the first time.

To everyone (anyone?) reading this, I wish you happy holidays and the best of luck in the new year.

Grumman Greenhouse

Time Machine

The Future

86th and Waiting

Sunday, November 25, 2012

Arizona on Film

Monument Valley

I already wrote my post on our trip to Arizona a while back, but I've been meaning to post some of the film shots that I took with the Xpan while I was there. I used almost all of my remaining Kodak E100VS in the process. I'm sad to see this film go out of production; it has some of the best sunrise and sunset color I've ever seen. Using it almost seems wrong. However, the Xpan was made for the wide open desert vistas, and I couldn't pass up the opportunity to shoot one of my favorite films in one of my favorite cameras. Film can't live in the freezer forever.

Road to Monument Valley

Monument Valley

Monument Valley

Spider Rock

Baltimore Grand Prix 2012

Untitled

So here's a post that's way overdue. Last September I finally got to go to the Baltimore Grand Prix (ok, "Grand Prix of Baltimore"). If you get a chance to go, I highly recommend it. Here's what you'll need to get these shots:

  • Canon 1D Mark II
  • Canon 400/5.6 L USM
  • CF or SD cards
  • Plenty of water!

Just stand as close to the fence as possible and shoot through the fence at your widest aperture and you should be good to go. This is where a shallow depth of field really helps you out. The fence is so close that it blurs right out of the picture. In many cases, there were two fences between me and the track, spaced about four feet apart. With such a long focal length, I was still able to shoot through both fences without a problem. I'd still recommend switching the lens to far focus range (8.5m to infinity) to keep the camera from being tripped up by the fence though.

Also note that "tickets" aren't on that list. All of these shots were taken from the public viewing areas outside of the track. It actually amazed me that some of the best viewing areas were left totally free.

Untitled Untitled

That's not to say that I wouldn't recommend tickets. The general admission will get you plenty of cool places to watch the race, and plenty of free schwag. Unfortunately, almost none of the viewing locations lend themselves to racing photography. On the other hand, if you're looking for shots of spectators, you won't be disappointed. There's plenty of good people-watching in the general admission areas.

If you can swing it, I'd also recommend getting the paddock pass. It's inside the convention center, which is a great place to cool off and watch the drivers and race teams prep the cars. In some ways it's a show unto itself. If you're into getting portraits of the drivers, this is the place to be. Just have the high ISO ready, as the lighting is fairly poor (1/30 f/2.8 at ISO 1600).

As a final note, here's a nine-shot composite image of turn 12 during the American Le Mans Series race. Each shot was a 2 second exposure at ISO 50, f/32.

Turn 12

It's amazing to see the variation in the tracks. Many of the wider and shallower turns (presumably sub-optimal) were due to other cars that were going through the turn at the same time. Here's a normal exposure from the same vantage point:

Untitled

Of course the 1D Mark II scored again. A camera that I bought used in 2005 is still making great images in 2012. You shouldn't have any trouble finding one for well under $1000. Happy shooting!

Sunday, July 8, 2012

Arizona Itinerary

Yes, it was a thousand miles. Yes, it was totally worth it.

Late last month we took our first trip out to Arizona using a nine-day itinerary that we put together back in 2010. Our original plan was to escape the cold of Maryland that March. Then we realized that the high desert of Arizona wasn't actually all that warm in early spring late winter, so we filed the itinerary away.

Before I continue though, I'd like to point out that this itinerary can be done in five days as well. So if you don't have nine vacation days, don't worry. Just change the two-night stays in Kayenta, Chinle, and Holbrook to one-night stays. What's more, you'll still get to be in the key locations at sunrise and sunset.


View Larger Map

Day 1:
Fly into Phoenix and drive to Cameron, stop for gas and supplies in Flagstaff. Cameron Trading Post has a nice hotel and a good restaurant, so I'd recommend staying there. Seriously, try the Navajo Taco. If you're really hard core, you can head over to the Grand Canyon for sunset (we didn't do this).

Desert View

Day 2:
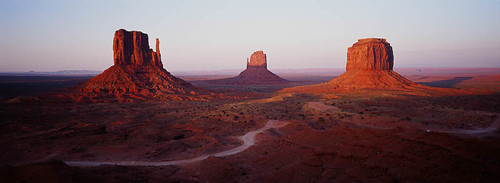
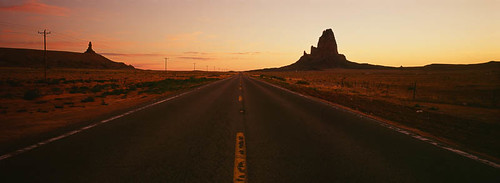
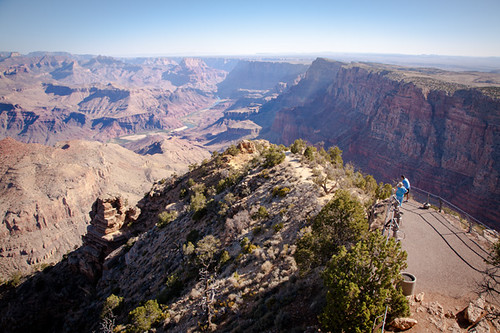
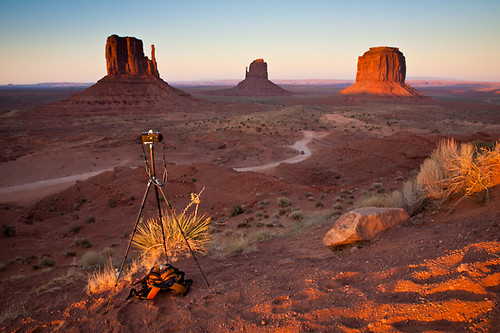
Get an early start and visit the south rim of Grand Canyon, which is about 45 minutes away from Cameron. The earlier you can get there, the better since the light is nicer, and the temperature is lower. Take the middle of the day to drive to Kayenta, then hit up Monument Valley for sunset.

Xpan Monument

Day 3:
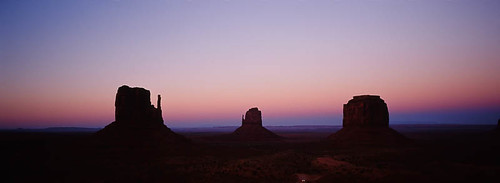
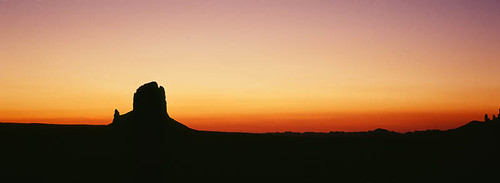
Head up to Monument Valley for sunrise, then do an early hike around the Wildcat Trail. Take plenty of water. Parts of the trail are sandy and therefore strenuous. Chill in the hotel for the hot part of the day, then head back to Monument Valley for sunset. I'd recommend booking a sunset tour with one of the local Navajo guides, which should run about $75 per person. Ask for the guide who plays his flute at the Big Hogan during the tour.

Day 4:
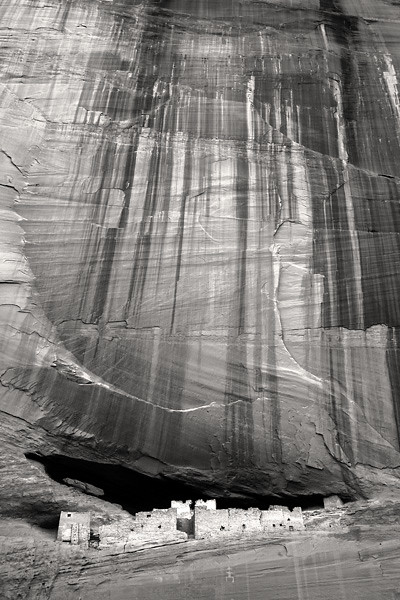
Gas up the car and drive down to Chinle (watch out for bulls and horses in the street), then hit up the north rim of Canyon de Chelly. Be sure to bring your binoculars to get a better view of the ruins.

Day 5:
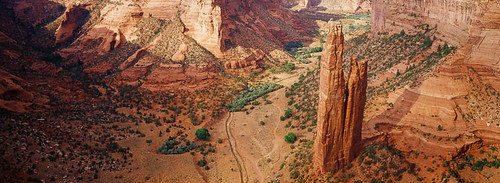
Take an early hike from the south rim down to the White House ruins. Again, bring plenty of water, most of which you'll drink on the way back up to the top. When you get back to the top, hop in the car and preview the rest of the south rim. Wait out the heat in the hotel, then head back out for sunset pictures at Spider Rock.

White House Ruins

Day 6:
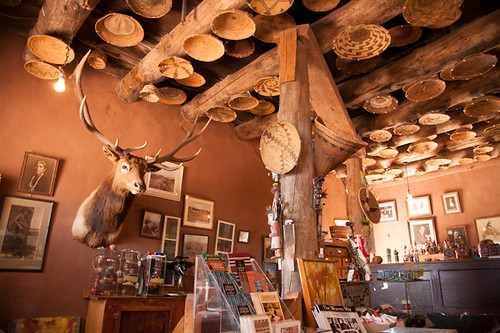
Take your time and make your way to Holbrook. Be sure to stop at the Hubbell Trading Post and Painted Desert along the way. I'd also recommend stopping at the Painted Desert visitor center to watch the film on how the park formed. Take some time in the evening to check out old Route 66 in Holbrook. Heck, you can even stay in a tepee at the Wigwam Motel.

Hubbell Trading Post

Day 7:
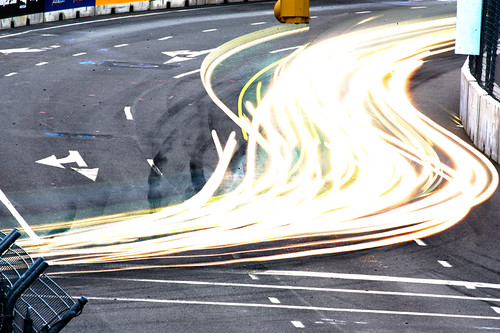
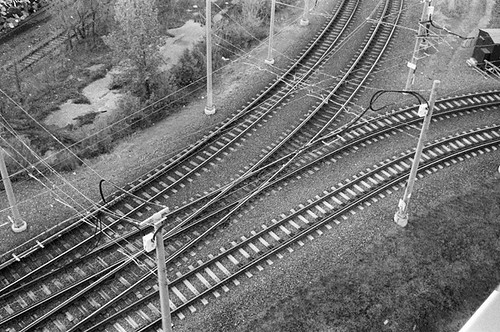
Petrified Forest. Take the morning to check out the amazing colors in the Crystal Forest, then head north to the Blue Mesa, Puerco Pueblo ruins, and Newspaper Rock. If you're into train-spotting, then this is also a great location since there's almost always train traffic along I-40. Again, escape the heat in the hotel, then head back to Blue Mesa for sunset pictures.

Day 8:
Listen to some Eagles and head over to Winslow. Hit up the Old Trails Museum, stand on "the corner", and walk old Route 66. Gas up the car and head south along AZ-87 (Bee Line Highway) to Phoenix. It's a fairly mundane drive at first, but it eventually opens up into an amazing mountain road. Be sure to stop and check out the saguaro cactus at Ballantine trail near mile marker 210.

Old Trails Museum

Day 9:
Fly out of PHX.

Other Tips:
Don't forget to make your hotel reservations in advance. There aren't a lot of options in towns like Cameron, Kayenta, and Chinle, especially if you care about the quality of your accommodations.

If you decide to book any tours or reservations, be sure to clarify whether Daylight Saving Time (DST) is in effect. Arizona does not observe DST, but the Navajo Nation does. I would also recommend not reading the time from your cell phone. Basically, most cell phones are configured to use the time of the nearest cell tower. The problem is that you don't know whether the nearest cell tower is actually in the Navajo Nation, so you don't know if your phone is giving you the correct time.

Also remember to pick up some extra jugs of water in Phoenix or Flagstaff. You never know what kind of cooling problems you or your car are going to have out in the desert. We didn't use up all our water, but the guys at the rental car return gladly took our unopened bottles.

Saturday, June 9, 2012

Test Rolls

As some of you know, I bought a Leica kit late last year. I've been gradually putting the gear through its paces. Of course the main item I was after was the M6. However, a Leica CL was also included. When I bought it, the former owner told me that the CL was actually his favorite camera to shoot with. At the time, I found this hard to believe with an M6 sitting right there. However, after taking it out and about in downtown Baltimore, I'm starting to see why.

Sutton Place

Patrick Joust was nice enough to give me a couple rolls of (very) expired T-MAX 400 at the Film in Baltimore meetup last March. I thought the CL would be the perfect test case.

I do have to say though, that this film was in bad shape. The lead sticking out of the canister was much lighter than the film inside the canister, and the film was so brittle that I actually snapped off the tip when I was loading it into the camera. It's interesting going out to shoot when you know that none of your shots may be coming out. As you may have noticed though, I like exploring, so even if the shots didn't come out, I could still write it off as "scouting."

In the end, NCPS did a great job developing and scanning the film. It came out a bit grainy, but hey, this was just a test.

Switch

Ready MARC

Qbert

Atlantic RO-RO Carriers

So the CL may not have the amazing build quality or cache of an M6. It's a practical photographic tool that accepts great Leica glass like the 40mm Summicron. And for a price that leaves some room for actual film and travel. Sounds like a deal to me.

Leica CL

Saturday, June 2, 2012

So It's June

Whoa, April and May blew by, and now it's June. Time for some updates.

April included trips to Summit Point and Monongahela National Forest. It was good to break the 1D Mark II out to shoot racing again. I'd lent the camera to my dad to take to Africa, so this was the first time I've really used it since. It didn't miss a beat.

Of course, you don't need a 1D to get shots like the ones below. I was going for a speed/blurring effect on the first shot, which was taken at 1/13 of a second at f/20, ISO 100. It takes several shots to get it right, since no one can track and pan perfectly. When you get it really right though, it's awesome.

Slow is Fast

Carousel

Monongahela was also fun, though the Smoke Hole motel we stayed in left much to be desired, especially for the cost. In any case, we visited Spruce Knob, the highest point in West Virginia, as well as Dolly Sods, a tundra-like expanse that bears great resemblance to areas way up in Canada.

On the Ridge

Bear Rocks Overlook

Spruce Knob

May included a trip to Shenandoah National Park. It was a chance to try out the Xpan since I got it back from an aborted repair down in DC. I'm still waiting for the film back on that one, but we also hit up Luray Caverns, which I haven't been to since I was a child. For the caverns, I thought it would be a good chance to shoot wide with the 17-40/4. It hasn't gotten much use since I got the 24-105/4. Unfortunately, I don't think my idea panned out. The pictures you see below are thoroughly cropped, so I probably would have done better to bring a fast 35/2 or something instead. I'm sure there are impressive, wide shots to be had, but the tour group was moving along pretty quickly, so there wasn't a ton of time to try every angle of composition. In the end, most of the wide shots I got were too cluttered. Photographer or not, I do recommend Luray Caverns though.

Luray Caverns

Luray Caverns

I also finally took the time to cut all my film from the past couple years with the Xpan. I couldn't let the lab cut them, since the shots are panoramic. I have this recurring vision in my head of a beautiful panoramic shot in E6, sitting on the light table, cut right in half. Painful.

While tedious, cutting film and seeing it on the light table through the loupe is one of the simple joys of photography that I think a lot of people miss out on. I've heard that with a really good loupe, your slides can look so good on the light table that it's enough to make you quit your real job to become a full-time photographer. In other words, the light table and loupe can be dangerously awesome.

Contact Sheet

Monday, March 12, 2012

Vice Moderation

Is film photography a vice? I was reading an article on Luminous Landscape about slide film yesterday, and the author's conclusion got me thinking. He said he couldn't imagine going back to slide film, especially from a cost perspective. Certainly, film does have more recurring costs than digital. But film photography is something to be cherished and appreciated. Some might call it a vice. The key for any vice though, is moderation. So shoot that roll of film, knowing full well what it's costing you in money, and what you're gaining in enjoyment.

Mutianyu

What does the Great Wall have to do with this message? Nothing, other than the fact that it's the exact opposite of moderation. But who cares? It is truly a wonder of the world, and well worth the long trip to get there. I was lucky enough to take my new Leica M6 and 35/2 Summicron along last month. In spite of the cold, the Leica never missed a beat. And the Tri-X flowed.

Perhaps a Leica is an example of moderation in itself. No frills, no excess, minimal design incarnate.

SFO to PEK

Where does the 747 fall in the continuum of moderation?

Saturday, January 28, 2012

That First Roll

There's a lot to be said about the first roll of film that comes out of a new camera. Simultaneously bringing all your experience to bear on a new photographic tool. The feeling of uncertainty that comes with film, followed by the satisfaction of getting that first roll back from the lab. It's completely intertwined with the act of photography itself.

W. Franklin St.

Occasionally it results in disappointment. The first time I went out to shoot with my Xpan, I completely botched the film loading process. After walking all over downtown Baltimore to finish a whole roll, I opened up the back of the camera only to find the film lead just sitting there. In the end, I simply had to write off the whole thing as a "scouting opportunity" and move on. It wasn't until just a couple months ago that I returned to some of those places for a do-over:

I-83

Of course, the real reason for this article is my first roll through the Leica M6, which I acquired about a month ago. This thing certainly lives up to the name. The meter only worked for about the first half of the roll before the cold killed the batteries. No matter though, because this is a fully mechanical camera. As long as you can set the shutter speed and aperture, it will gladly keep shooting.

I'll admit, eyeballing the exposure was a bit intimidating at first, growing up in an automatic age. A little practice with a free Exposure-Mat and soon I was memorizing f/8 exposures for all kinds of situations.

I was also afraid that the pictures wouldn't have enough contrast since I didn't have any E39 filters. I almost always use a 49mm Orange(G) filter on my Xpan to add contrast. Lo and behold, the legendary Leica lenses came through, adding their own creamy contrast.

Museum Steps

The sheer simplicity of it really is mind-boggling. And nothing else in photography feels quite like the smooth, manual action of winding the film crank on a quality camera. Just wow. Need a Leica alternative? Fear not, the winding action on the venerable Nikon F3 is extremely impressive as well.

But I digress, this is supposed to be about photography, not mechanics. It's that clean, featureless simplicity that allows the photographer to focus on being a photographer.

Here's to another amazing tool in the toolbox.

Sculpture Court

Monday, January 16, 2012

Camera Porn How To

Product photography is a curious thing. For instance, here's a picture of a Leica M6 with a dual-range 50/2 Summicron with ugly goggles, an uglier strap, and tape all over it. Yet you still want it.

M6 Dual-Range

Sometimes it really is the object itself that you want, and it doesn't matter how good or bad the photo is. However in most cases, people have probably never actually touched the object, so all they have to go on are some pretty pictures and reputation/cache/speculation/marketing (cough X-Pro1). Curious.

Anyway, here's a little how-to for creating your own camera porn for the masses. It's pretty straight forward. All you need is:
  • A semi-long lens (100mm+)
  • A soft light source (indirect light from a large window, or a softened off-camera flash)
  • A clutter-free background (any plain wall will do)
  • Oh yeah, and a camera


Camera Porn Studio

For these shots, I used an old Nikon SB-28DX flash triggered from my 5D with a low-end Pocket Wizard. The flash fired at 1/4 power through a Westcott umbrella, which softened the light.

Initially I tried using my trusty 50/1.8 lens, but quickly discovered that this was not long enough to keep the background clutter out of the lens's perspective. I switched over to the 24-105/4 (at 105mm), which did the trick of narrowing the perspective of the background, removing unwanted junk from the scene.

I also wanted to make the object stand out, so I had to make sure that there was enough light fall-off between the object and the background, so the object would be much lighter. To do this, I had to keep the light source close to the object (about 2 feet), but far from the background (about 12 feet).

In order to kill any ambient light in the shot, I used the fastest shutter speed I could. The 5D syncs at 1/200, so all the pictures were taken at 1/200 at f/11.

For more information on general product photography, I highly recommend you go check out Strobist. And now back to our regularly scheduled camera porn...

Leica M6

Visoflex 400

Visoflex 400

Leica CL